Practical guidebooks for the more adventurous traveller.
— The Herald
New Zealand - The Great Walks
Excerpt:
Sample track description
Contents list | Introduction | Planning your tramp | Using this guide | Sample route guide | Sample track description
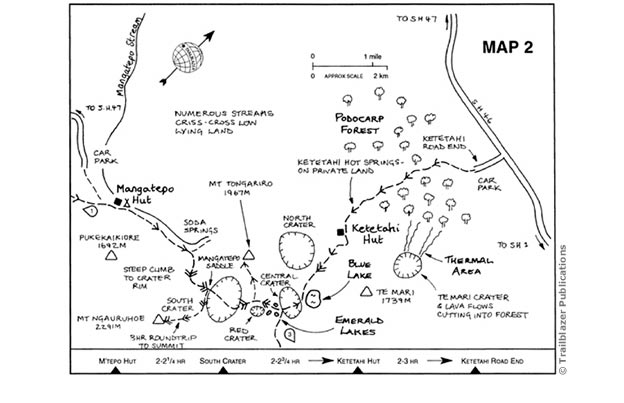
Mangatepo Hut to Ketetahi Hut 10km/4-5 hours; Map 2
The track from Mangatepo Hut to Ketetahi Hut is part of the renowned Tongariro Crossing. Termed the ‘finest one-day walk in New Zealand’, it's a spectacular day's tramp through some truly unusual volcanic scenery.
Fairly strenuous and exposed throughout, it demands good weather to enjoy its many features. In very low or dense cloud it can become a tedious, difficult slog.
Because of the large numbers of people undertaking the Crossing, if you're staying at Mangatepo Hut make an early start to avoid the massive surge of people streaming up the valley later on.
The streams in the area are unsuitable for drinking due to the large quantities of volcanic chemicals leaching into them, so make sure that you carry sufficient water with you.
The track begins by following the Mangatepo Stream up the valley, scrambling over a series of lava flows from Mount Ngauruhoe. Flows of older, grey lava are partially covered by the tracks of lumpy black lava from later eruptions, the most recent just fifty years ago.
There has been some debate as to the origin of the Mangatepo Valley, but the easily discernible moraine and scree ridge on the north-west side of the valley suggests that it is glacial.
After an hour you reach the head of the valley and a junction with a five-minute spur track to Soda Springs. Full of bubbles of dissolved gases, the spring emerges from under an old lava flow, the strong smell of sulphur informing you when you are close.
The surrounding area is often boggy, the extra moisture supporting mosses and plants that give the area colour and vibrancy in summer.
Having returned to the main track, continue up the valley, ascending steeply to reach, after 45 minutes, the Mangatepo Saddle between Mount Tongariro and the base of Mount Ngauruhoe.
Although the route is steep, the track is clearly marked amidst the lava rubble.
The views from the saddle are superb, both of the ascending, endless lines and ridges of Mount Ngauruhoe in front of you and the countryside stretching to the west. If it is particularly clear, you may even be able to make out the perfect cone of Mount Taranaki, some 140km away on the west coast.
There is a signpost indicating the route to follow for an ascent of Mount Ngauruhoe. This is a very tempting side trip which in fine weather is a very achievable proposition, time allowing.
However, because there is so much else to see on this stage of the track you may wish to omit the ascent so you can fully appreciate the other features to come.
If you do decide to climb Ngauruhoe, the return trip takes around three hours. It is a 600m climb on deep, strength-sapping scree. This ascent should not be attempted in bad weather or during winter without both mountaineering experience and the correct equipment.
Poles mark the early stages of the ascent but soon stop. Follow the rock ridge at the base of the volcano directly uphill. Beyond the ridge you can access the outer crater gully, where you have a choice: turn left and climb to the highest point on the outer crater or right to the top of the inner crater.
Do not, however, enter the inner crater, which often has strong, overpowering gases inside. Watch out, too, for falling rocks and be aware of the danger of dislodging a small avalanche of scree onto other climbers below you.
The panoramic views from the top are exemplary. The route for the next couple of days can be clearly seen and the particularly eagle-eyed should be able to determine the various huts on the track.
Back on the main track, continue from the Mangatepo Saddle across the South Crater, which isn't actually a true crater but a drainage basin for the surrounding volcanoes.
Nevertheless it is an impressive feature, looking like a vast natural amphitheatre. The track across is flat and peculiarly lunar, marked by tall poles.
Large rocks ejected from the volcanoes lie scattered on the orange-yellow clay soil, which may be dusty or muddy underfoot depending on the weather.
At the far side of the crater, the track climbs steeply 200m along a sharp spur. At the top of the ridge you look out over Oturere Valley and the Kaimanawa Mountain Range to the east.
Swinging north you proceed along the ridge past some large, prominent boulders. The track peaks at the day's highest point, the strangely beautiful Red Crater (1886m/6186ft), shortly after.
The crater is so named because of the implausible colour of its sheer sides.
A poled route now branches off to the summit of Mount Tongariro. This two-hour return track is fairly easy and passes through an interesting volcanic area.
The summit is marked by two trig points. The true summit is the second of the two trigs, concealed by a rocky prow.
Back on the main trail, the track skirts the edge of Red Crater. The route is high and exposed and you must be well equipped, even if undertaking only the Crossing, since it can be a hostile place in bad weather.
As you traverse the crater rim, peer into its fuming interior. The odd feature on the far side of the crater is a dyke, an old magma feeding pipe that leads into the vent of the volcano. More durable than the surrounding ash and scoria, it has become exposed as softer rock is eroded from around it.
You now descend steeply on the far side of the crater, dropping 200m past a series of steaming, hissing vents. The soft, shifting red-black scree is unstable underfoot and you quickly slip-slide to the bottom, arriving at the vibrant Emerald Lakes.
These impossibly turquoise lakes owe their colouring to minerals washed out of the Red Crater. They fill old explosion pits and make for arresting features in an otherwise barren landscape of rock and scoria.
The track passes between the lakes and then divides: the right-hand fork heads south-east towards Oturere Hut, whilst the left fork continues north, descending sharply into the Central Crater.
Like South Crater, this is actually a drainage basin. Having crossed Central Crater on a level surface amidst pockmarked boulders and lava bombs left from previous eruptions, you now climb 30m to a ridge adjacent to Blue Lake.
As you cross Central Crater look back to see Red Crater, Mount Ngauruhoe and Mount Ruapehu aligned behind you. There is also a good view of a large black lava flow that cooled on the crater floor. Blue Lake has formed where cold freshwater has filled an old vent.
It used to be called Te Waiwhaakatao-te-Rangihiroa, ‘Rangihiroa's Mirror’, after the Maori Te Rangihiroa who explored the volcanic plateau around 1750.
The track skirts the lake then begins to descend Mount Tongariro's northern flank beneath North Crater. This large flat-topped crater once contained a lava lake that cooled and infilled the vent.
Now zigzagging on long switchbacks, you pass through a fragile alpine area of red tussock; it is vital you stay on the track, resisting the temptation to descend in a straighter, faster line.
The path descends 300m before you arrive at the well positioned Ketetahi Hut. This 24-bunk hut is a pleasant spot to stay: although overrun by day-trippers, by late afternoon they will have left in order to meet their buses, allowing you to enjoy in peace the excellent views of lakes Rotoaira and Taupo and Mount Pihanga to the north-east.
New Zealand - The Great Walks
Excerpts:
- Contents list
- Introduction
- Planning your tramp
- Using this guide
- Sample route guide
- Sample track description
Latest tweets